
 by
by 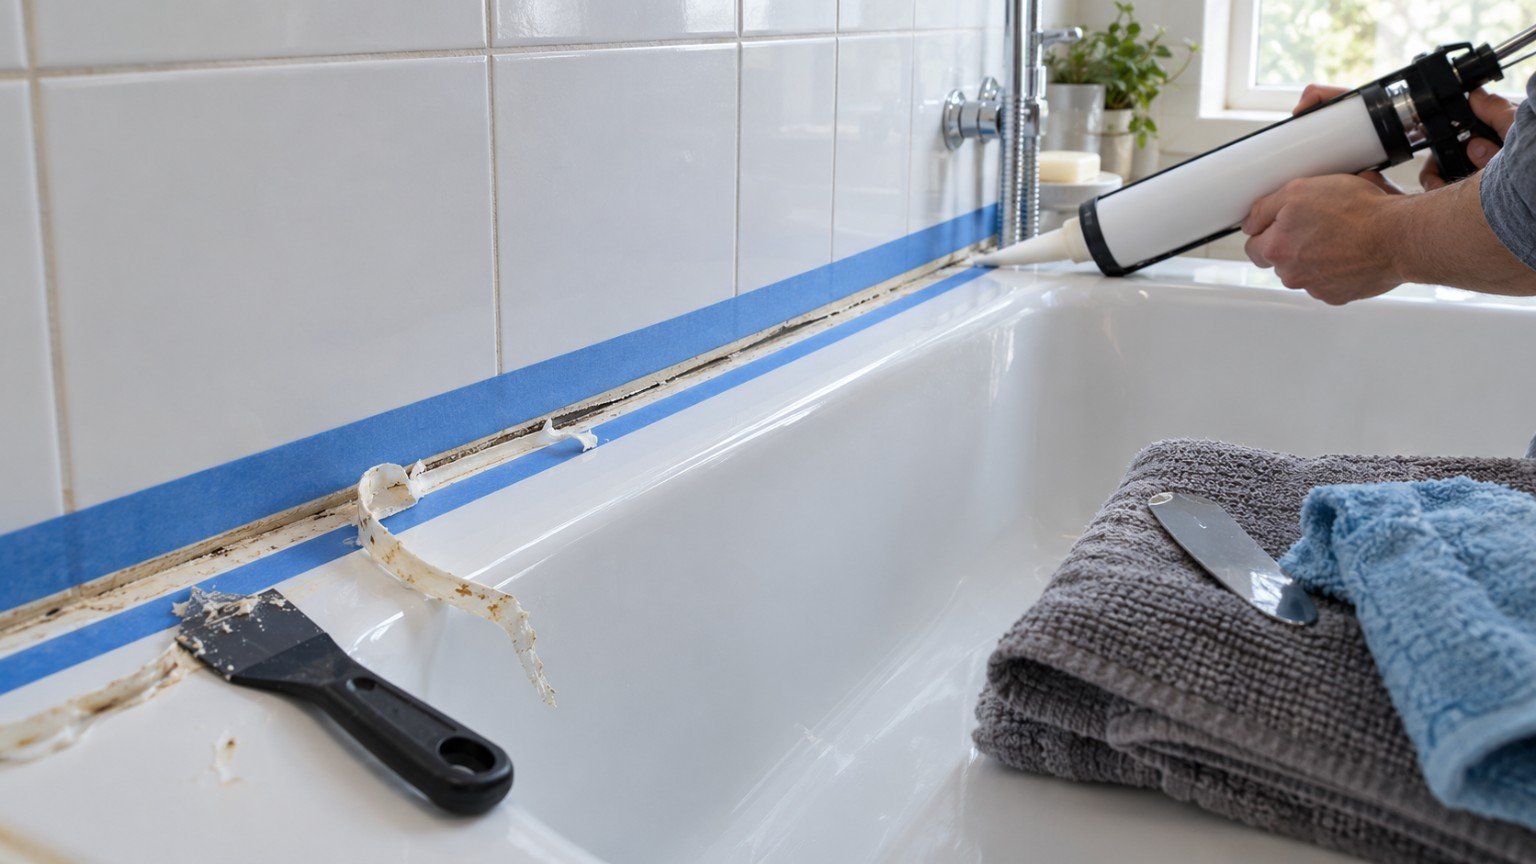
Silicone sealant around a shower base, bath, sink or benchtop does an important job even though it is easy to ignore. It keeps water out of gaps that would otherwise let moisture track into the wall or floor cavity behind. When that silicone starts to discolour, peel, crack or pull away from the surface, it is no longer doing its job properly, and the fix is a genuinely satisfying weekend DIY task rather than something that needs a tradesperson.
If mould keeps returning to the same strip of silicone no matter how often you clean it, our guide on mould, humidity and ventilation in the home covers the broader moisture picture. This guide focuses specifically on replacing the seal itself.
Signs it is time to re-silicone
- Black or pink mould staining that will not lift with cleaning
- Silicone that has shrunk, cracked or pulled away from the tile or surface, leaving a visible gap
- A soft, spongy feel when you press the bead of silicone
- Water pooling or seeping through at the join instead of running off
Tools and materials
- A silicone or sealant removal tool, or a sharp utility knife
- Methylated spirits or a dedicated silicone residue remover
- A lint-free cloth
- A good quality bathroom or kitchen and bathroom-rated silicone sealant, in a mould-resistant formula
- A caulking gun
- Painter’s tape
- A silicone smoothing tool or a gloved fingertip
Step 1: Remove the old silicone completely
New silicone will not bond properly over old silicone, even a small amount left behind, so this step matters more than people expect. Run a utility knife or sealant removal tool along both edges of the old bead to loosen it, then peel it away in strips. Take your time getting into corners. Once the bulk is removed, wipe the area down with methylated spirits on a lint-free cloth to lift any remaining residue and oil, and let it dry completely. Any leftover trace of old silicone or soap scum will stop the new bead from adhering properly and it will fail again quickly.
Step 2: Check for damage underneath
Before resealing, have a look at what the old silicone was covering. Timber, plasterboard or particleboard that feels soft, swollen or discoloured underneath the seal is a sign that water has already been getting through for some time. Resealing over the top will stop it getting worse, but the affected material itself may need attention. If the area is small and just surface-affected, resealing is often enough. If it is soft over a wider area, that is worth a professional look before you reseal.
Step 3: Mask the edges
Run a strip of painter’s tape along each side of the gap you are about to fill, leaving a consistent gap between the two strips. This is optional but makes a genuinely big difference to how neat the finished line looks, especially for a first attempt.
Step 4: Apply the new bead
Cut the nozzle of the silicone tube at a 45-degree angle, sized to roughly match the width of the gap you are filling. Load the tube into the caulking gun and run a slow, steady, continuous bead along the join, keeping the gun moving at an even pace rather than stopping and starting. Immediately after laying the bead, run a gloved finger or a silicone smoothing tool along it in one smooth motion to press it into the gap and create a neat, slightly concave finish. Peel away the painter’s tape straight away, before the silicone starts to skin over, for the cleanest edge.
Step 5: Let it cure properly
Most bathroom silicones need at least 24 hours to cure fully, and the area should not get wet during that time. Check the product packaging for the exact curing time and avoid using the shower or running water over the area until it has passed.
Keeping the new seal in good condition
A mould-resistant silicone, good bathroom ventilation and wiping down wet areas after use will all help the new seal last considerably longer than a poorly ventilated, rarely dried bathroom would allow.
When to call a professional instead
Re-siliconing is safe, straightforward DIY. It is worth bringing in a professional if you find extensive water damage, soft or rotting structural material behind the seal, or a leak that keeps returning even after a proper reseal, since that can point to a problem further back in the waterproofing membrane rather than the visible silicone line.
Join The Discussion